FedEx Ship Manager is a very common tool to use when shipping dangerous goods. Most businesses that ship dangerous goods use FedEx as a courier to move their shipments of dangerous goods. The free FedEx Ship Manager software is a proprietary software licensed by FedEx to anyone who wants to us it. It has many different features such as: shipping, tracking, reports, and scheduling a pickup. Today we will focus on its dangerous goods features and walk you through the process of shipping a dangerous goods shipment in FedEx Ship Manager.
Step 1: Getting Started
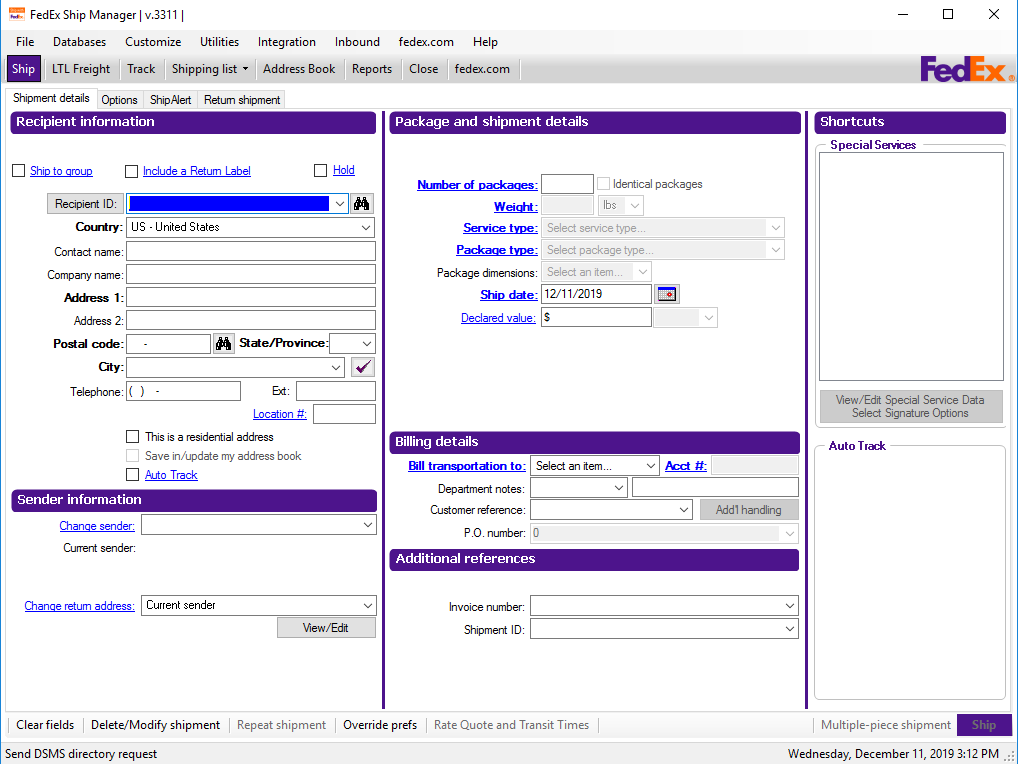
Go ahead and open up FedEx Ship Manager. Once the program has booted up, you will be greeted by an empty home screen that should look like this:

You will want to fill out all the fields marked in bold in the Recipient Information box. This is the bare minimum amount of information you will need to fill out in order to ship your shipment. It is suggested to fill in as much information as you can, including: contact name, company name, the full address, and a telephone number.

Step 2: Package and shipment details
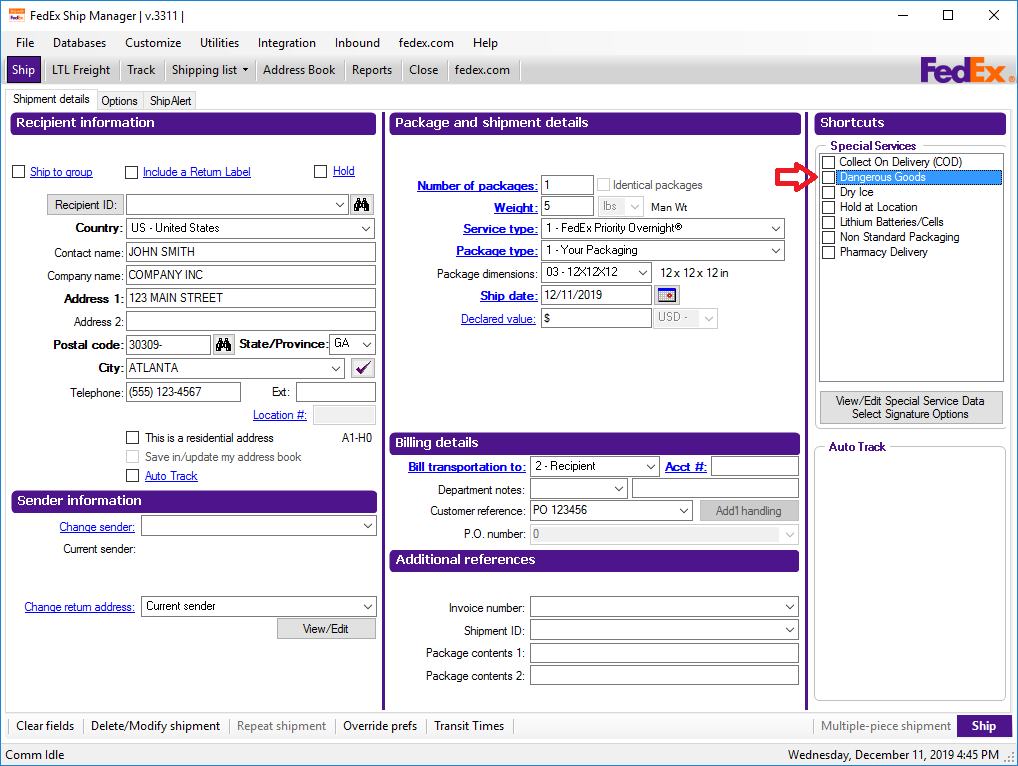
Next up you are going to fill in all the necessary information in the package and shipment details box. The Bold Blue Underlined fields are required to be filled out in order to ship your shipment. It is recommended to fill out the Package dimensions field with your packages actual dimensions. Also, declared value can be left blank if the shipment is not an air freight shipment.

Once you have filled out all of the package and shipment details information you are ready to move on to the dangerous goods section of FedEx Ship Manager.
Step 3 filling out the dangerous goods info
Click on the box labeled Dangerous Goods in the short cuts box, in the top right corner of the window.

Once you have checked the dangerous goods box, it will open up a window to enter in the some information.

It is always a good idea to put in your 24 hour emergency contact information in the Additional handling box, like below:

Once you have gotten your 24 hour emergency contact information entered, it is time to click on tab 2, labeled Dangerous goods entry.

Now that you have clicked on tab 2, Dangerous goods entry, you are ready to enter the appropriate information about what DG article(s) you are shipping.
We will manually enter this information in to FedEx Ship Manager, instead of setting up any Dangerous Goods IDs.
First we will start with entering in the UN (ID) number. For this example we will be using UN 2990 Life-saving appliances, self-inflating. Once we have entered in the UN number hit TAB to move down to the next line # of packages. Enter the number of packages for your shipment, for this example we will enter 1.
Type in the packing instruction number in the Packing instruction field.
Moving down, enter the Net quantity/Gross mass, then select the unit of measurement.
Next up, type in the Type of packaging that you are using.
Finally, select whether this is shipping Passenger and Cargo aircraft or Cargo aircraft only by checking the appropriate box.
Note: If there are any Authorizations (EX Letters, DOT-SP’s, etc) fill them out in the Authorizations box, separated by commas.

Once you have filled out all the applicable data fields for your specific dangerous goods shipment, it is time to add this DG to your shipment. To do this just hit Add to shipment in the bottom right of the window.
Once you’ve clicked Add to shipment, the blue highlighted line will have moved from upper box to the actual Dangerous goods in shipment box below.

Now it’s time to look over your work and double check all the information you’ve entered in to the fields.
If it all looks good to you then it’s time to click OK.
Step 4 Finishing up
Your home screen should now have the Dangerous goods box checked now.

Now that you’ve finished up entering your shipment, it’s time to load the right paper. Make sure that you load four to five sheets of the red candy-stripped FedEx DG Shipper’s Declaration paper into your printer before hitting the ship button.
Once you’ve printed your dangerous goods shipper’s declaration documents, you need to sign them and attach securely them to your package.
Conclusion:
FedEx Ship Manager is a powerful shipping tool, which is also used to ship dangerous goods by many people and companies all over the world. Once you have your shipment ready to ship, enter in all the appropriate information regarding the recipient. Next, you will enter in all the details pertaining to the physical shipment itself. Now you move on to the dangerous goods part of the process by adding your emergency contact info along with information about you and your company. Next, you will move on the adding in the actual information for the dangerous goods you are adding to the shipment, including the: number of items being shipped, the UN number, the packing instruction number, net quantity and type of packaging (also any authorizations if needed). Finally, you will add the dangerous goods to your shipment by clicking “Add to shipment” and you are set to go!

